Apple last week launched watchOS 10, the latest major software update for compatible Apple Watch models, as well as the new Apple Watch Series 9 and second-generation Apple Watch Ultra, both of which come with watchOS 10 pre-installed. Headline watchOS 10 features include a new Smart Stack interface with widgets, new watch faces, and more.

In this article, we've listed 22 other features and enhancements in Apple's new smartwatch software, many of which may have gone under your radar. Bear in mind that watchOS 10 requires Apple Watch Series 4 or later and an iPhone XS or later running iOS 17.
1. Automate Night Mode
On Apple Watch Ultra models, watchOS 10 brings a new Modular Ultra watch face that, like the Wayfinder face, supports Night Mode. Night Mode puts a red filter on the display, and previously could only be manually activated by turning the Digital Crown.
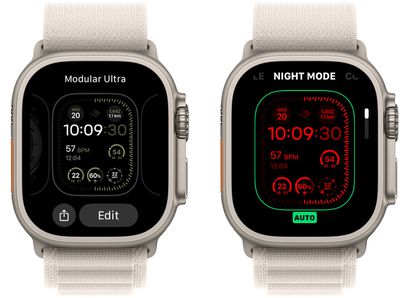
In watchOS 10, however, there's a Night Mode setting in the watch face edit screen for these two watch faces that lets you set it to Auto or On/Off. On the Auto setting, Night Mode will automatically activate in poor lighting conditions, such as when your sleeve is covering your watch or when you look at it in a dark room. Note that turning the Digital Crown no longer works, as this action now brings up the new Widget Stack.
2. Check Control Center Status
Small icons at the top of Control Center indicate the status of certain settings — for example, that your Apple Watch is connected to cellular, your location is being used by an app, and features like Airplane Mode and Do Not Disturb are on.
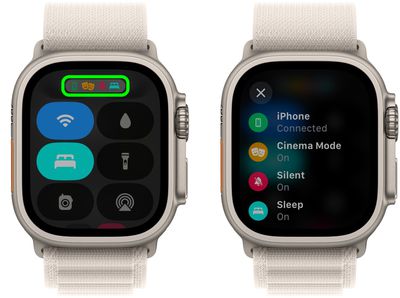
If you're not sure what a displayed status icon means, you can now tap the icons to get details.
3. Set Multiple Timers
Like iPhones running iOS 17, you can set multiple concurrent timers on Apple Watch and label each one to distinguish them easily.
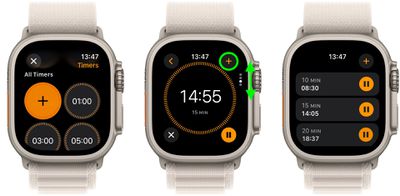
Open the Timer app, create and start a timer, then tap the + button in the upper right corner to return to the Timers screen, where you can create and start another timer.
With multiple timers counting down, you can use the Digital Crown to switch between timer displays, or alternatively you can keep track of them in the timer list. To assign a label such as "cupcakes" to a timer, use Siri. Raise your Apple Watch, then say something like "Set a 12 minute cupcakes timer."
4. Access the App Switcher
In previous versions of watchOS, you could access the Dock by pressing the Side button, but in watchOS 10 this action has been reassigned to the Control Center.
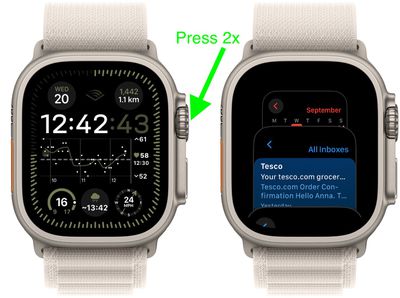
You can, in fact, still access the Dock (now called the App Switcher) with a double press of the Digital Crown. Turning the Digital Crown scrolls through apps, and the most recently used app appears at the front of the Dock with other apps behind it, in the order they were last opened. Apps that are currently running a session — a Maps navigation session or a Workout session, for example — appear at the front.
You can also remove apps from the App Switcher: turn the Digital Crown to the app you want to remove, swipe left on the app, then tap X.
5. Adjust the Flashlight
When the flashlight it activated, you can now adjust the brightness intensity by turning the Digital Crown up and down.
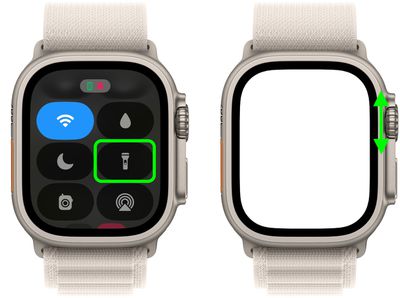
To turn on the flashlight, press the Side button to open Control Center, then tap the Flashlight button. Don't forget, you can also swipe left to choose a mode — steady white light, flashing white light, or steady red light.
6. Set a Target Elevation Alert
In the compass app, you can set a target elevation and receive an alert after going beyond it. The new alert option is designed to help you stay safe and remind you to rest and acclimate as you move.
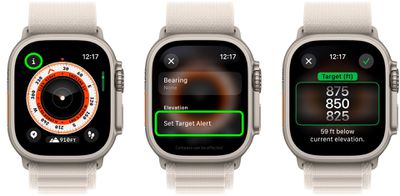
Open the Compass app, tap the info (i) button, then tap Set Target Alert. Turn the Digital Crown to set the target elevation, then tap the check button, and you'll receive the alert when the elevation is exceeded.
7. Get Relative Waypoint Elevation
Each screen that shows the compass dial in the Compass app has a new Elevation button at the bottom of the display.
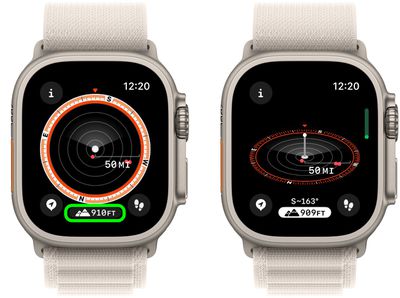
Tap it, and you'll get a 3D-like view of your waypoint elevations relative to your current elevation.
8. Browse Waypoints
In watchOS 10, you can browse waypoints, including those you’ve created in the Compass app as well as waypoints from guides in the Maps app.
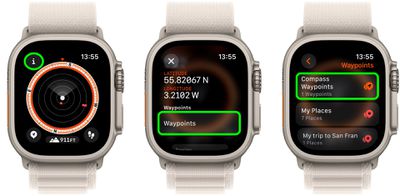
In the Compass app, tap the info (i) button, then tap Waypoints. Tap Compass Waypoints, and you'll see any waypoints you’ve created as well as automatically generated waypoints such as the location of your parked car and the last estimated locations where cellular connectivity and Emergency SOS were available.
You can also tap a guide, such as My Places or a guide you created in the Maps app, to view those waypoints on the compass. Note that waypoints that are more than 50 miles from you won’t appear on the compass dial.
9. Find Your iPhone With Directions
The Apple Watch Series 9 and Apple Watch Ultra 2 share the same updated Ultra Wideband chip as can be found in the iPhone 15 series, so if you have one of the latest Apple Watch models you can use Precision Finding to ping your nearby iPhone 15 and get accurate directions to it.
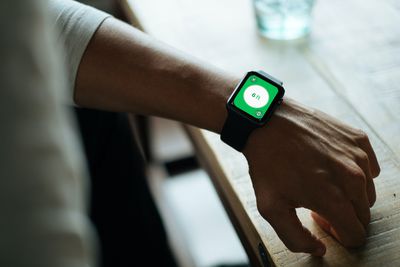
On your Apple Watch, press the Side button to bring up the Control Center, then tap the Ping iPhone button. Your iPhone will play a sound and, if your Apple Watch Series 9 or Ultra 2 is within range, the screen will display a general heading and distance to your iPhone, and the size of the circle increases to guide movement in the correct direction.
10. Find Hiking Trails
In watchOS 10, you can use the Maps app to find hiking trails and learn more about them, including details like their name, length, highest and lowest elevations, and the distance from your current location to the nearest access point.
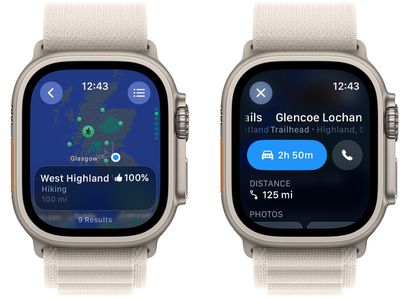
In the Maps app, scroll to the area you want to search, tap the search button, then enter "trails" into the input field. Nearby trailheads will appear as green dots that you can tap, and the name of a trail appears near the bottom of the display. You can also turn the Digital Crown to browse through nearby trail results.
11. View Offline Maps
In iOS 17, Apple has added the ability to download Maps for use offline, providing access to turn-by-turn directions and information for a chosen area even if you do not have a cellular or Wi-Fi connection.
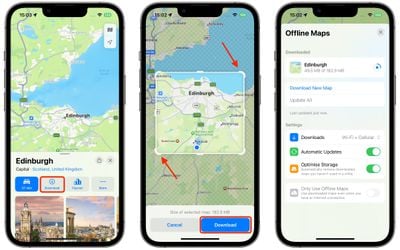
Offline maps are automatically available on Apple Watch when your iPhone is on and within Bluetooth range (about 33 feet or 10 meters). To learn how to download offline maps on your iPhone, see our dedicated how-to.
12. View Maps Walking Radius
The Maps app now includes a new Walking Radius feature that shows you how long it will take to walk to points of interest around you.
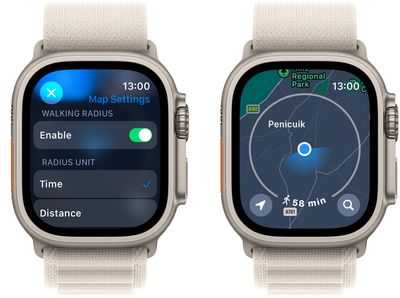
To change the radius, turn the Digital Crown. You can increase it to a walking time of up to 60 minutes. To change the radius unit to distance, touch and hold the map, scroll down, then tap Distance below Radius Unit.
13. Share Your Location
Like in iOS 17, you can now let others know where you are by sharing your location in Messages, and it will be updated in real time right in the conversation.
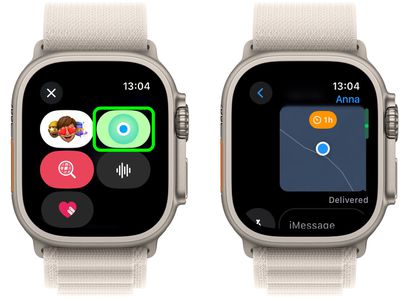
Start a new message or open a conversation, tap the A button, then tap the Share Location button. You can then choose to show your live location (Share), which updates in real time, or share your static location (tap the pin icon, then tap Send Pin).
If you share your live location, you can do so For One Hour, Until End of Day, or Indefinitely. To stop sharing your location, simply tap the shared location, then tap Stop Sharing.
14. Start a Group FaceTime Call
In watchOS 10, you can now start group FaceTime audio calls right on your Apple Watch.
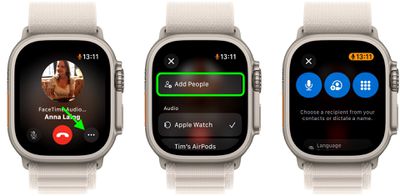
Open the Phone app on your Apple Watch, start a FaceTime audio call, then tap the ellipsis button and tap Add People to choose a contact. When someone joins the call, tap 2 People Active, tap the + button, then choose another contact.
15. Log Your State of Mind
Using the Mindfulness app on Apple Watch, you can log your mood at different times throughout the day and input an overall mood for the day.
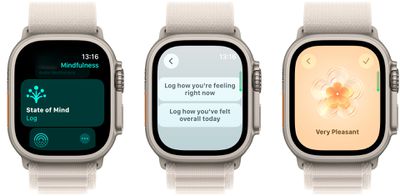
Tap State of Mind, then tap either "Log how you're feeling right now," or "Log how you've felt overall today." Turn the Digital Crown to indicate how you're feeling then tap the checkmark button. You'll then be asked to choose words that describe how you're feeling and what's having the biggest impact on you.
After you've logged your state of mind, you can check it against other lifestyle factors in the Health app on your iPhone, under Mental Wellbeing -> State of Mind.
16. Record Video
For the first time on Apple Watch, in watchOS 10 you can use the Camera Remote app to record video from your iPhone.
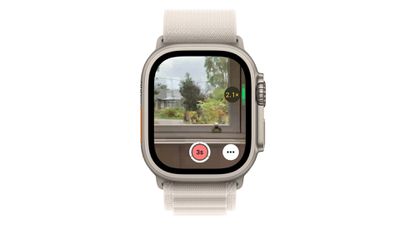
Simply open the Camera Remote app, position your iPhone to frame the shot using your Apple Watch as a viewfinder, turn the Digital Crown to zoom, then touch and hold the Shutter button to start recording video. Release the button to stop.
17. Plan Home Energy Usage
In the Home app on Apple Watch, Apple has added a new "Grid Forecast" section like the one found on iPhone in iOS 17. The feature is designed to use your location to tell you when "clean" energy is available to use, so you can be mindful of when you're using energy.
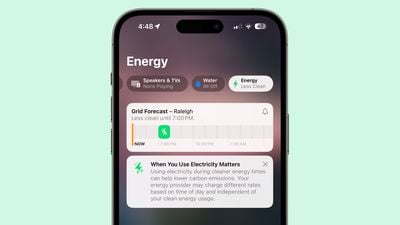
Open the Home app, then tap the Energy category to show the Grid Forecast. Green bars in the widget indicate when cleaner energy is available in your area. If there are no bars, cleaner energy isn't forecast for the near future.
If you're traveling, Grid Forecast shows energy information for both your home location, and the location of your paired iPhone. Note that Grid Forecast is available only in the contiguous United States.
18. Add Another AirPlay Device
While controlling audio on an AirPlay device such as HomePod, you can switch to or add additional AirPlay devices using the Now Playing app.
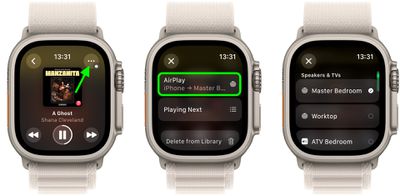
On the Now Playing screen, tap the ellipsis (three dots) button. Tap AirPlay, then add devices by tapping them. You can also stop playback on any device simply by tapping it.
19. Type to Speak
Using the Live Speech accessibility feature, you can type on Apple Watch and have your words spoken aloud, both in person and on phone and FaceTime audio calls. Live Speech can be set up on Apple Watch by going to Settings -> Accessibility -> Live Speech, where you can choose a voice to use.
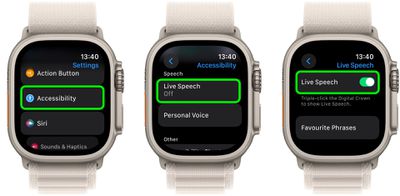
After setting up the Accessibility Shortcut (Settings -> Accessibility -> Accessibility Shortcut -> Live Speech) you can triple-click the Digital Crown and type what you'd like to have spoken out loud.
20. Change Your Email Signature
By default, messages you send from your Apple Watch are signed with "Sent from my Apple Watch." Prior to watchOS 10, you couldn't customize your email watch signature, but now you can.
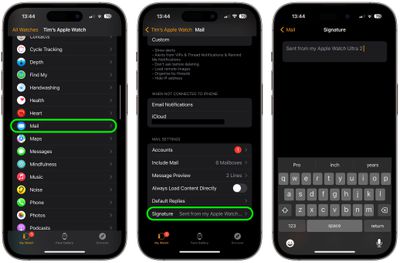
Open the Watch app on your iPhone, tap My Watch, tap Mail, then tap Custom. Tap Signature, then create your new signature.
21. Share a News Story
watchOS 10 introduces an option to share news stories in Apple News from your Apple Watch.
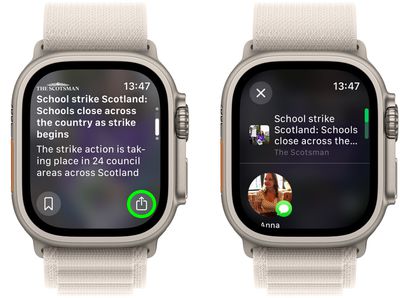
Open the News app on your watch, scroll to a story, then tap it. Scroll down, tap the Share button, then choose a sharing option.
22. Ping Your Apple Watch
For some time now, it's been possible to ping your misplaced iPhone with your Apple Watch. In iOS 17, you can now do the reverse and ping your Apple Watch with your iPhone if you forgot where you put it down.
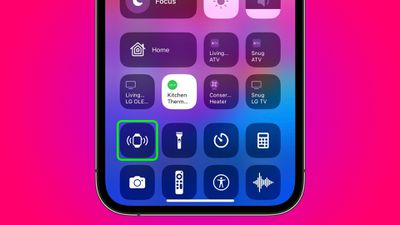
Apple doesn't include the new Ping My Watch button in the default Control Center set, but you can add it manually: Go to Settings -> Control Center, then under "More Controls," tap the + button next to Ping My Watch. (Okay, technically not a "watchOS 10 feature," but still worth knowing!)











Top Rated Comments
The new changes and the complete deletion of the Dock are atrocious, but that's Apple's way of making things more complicated by making them more simple and taking away choices. I just found out today another Achilles heel to making widgets swipe up. Swipe up does not work inside of apps, at least it didn't work inside of my fitness app where I was trying to access my timer widgets while working out (since my old method of accessing both apps from my Dock is now gone). I'm not sure if this is something app makers have to implement, or if generally swipe up for widgets isn't meant to work inside apps.
One "improvement" I don't really like is the use of the side button for control center. I don't think a dedicated button is really necessary, and it looks weird when control center comes up briefly when activating Apple Pay.
It's nice your faces are now locked and not moving unintentional. I know some will disagree.